Showing posts with label Ableton. Show all posts

Friday, October 26, 2012

Ableton Push: Integrated, Touch-Sensitive Hardware Control for Live


Now, Ableton is doing its own hardware. Sure, Ableton’s logo was on the Akai APC40 and Novation Launchpad, and yes, “engineering by Akai” is stamped on the Push. But make no mistake: this is really the first Ableton hardware, and it shows.
Push is a grid controller with extra keys and encoders for navigating features. It shows the influence of devices like the monome (and divides up that grid like the Pages and 7up patches from the community). But it also includes controller features that are specifically integrated with Live, recalling custom controllers used by Monolake.
Ableton pitches this as a hardware “instrument,” but it’s both instrument and controller. And Ableton says it solves the problem of “how to make a song from scratch,” but it also solves the problem of how to perform with Live. In fact, it solves the problem of how to make a song from scratch while performing, coupled with some new Live 9 clip recording enhancements that work with other controllers, too. In typical Ableton fashion, then, it doesn’t really matter whether “live” means “live onstage” or just “working faster in the studio.”
As with Live 9, I got to spend some time playing Push and talking to the developers who worked on it last week at an event with other press, partners, and artists at Ableton’s offices. The hardware is near-final, but software is still in development, so some features are subject to change.
You can read the specs anywhere, so let’s list the biggest surprises (for me, anyway):
  • The pads sense velocity and pressure – no more grids limited to on/off only.
  • A ribbon controller along the side adds additional control and expression.
  • All this light and color runs on bus power. (Awesome feature: plug in external power, and everything gets brighter.)
  • It’s hacker-friendly: USB class-compliant (hello, Linux, iOS), and fully controllable via MIDI. (You can evidently even use the displays via SysEx.)
  • You do get some footswitch inputs, too. (someone asked about this in comments, so it must be a surprise)


You get 64 velocity-and pressure-sensitive multi-colored pads, plus eleven touch-sensitive endless encoders.
As an “instrument,” Push maps to an isomorphic pitch layout. It’s I think the first time we’ve seen such a layout in mainstream, non-niche hardware (unless you count iPad apps). That makes the grid map usefully to different keys and harmonic structures, and it’s there by default – no extra work needed. In a feature I hope survives from the prototype to the final version, there’s even feedback on equivalent pitches as you play.
The advantage of isomorphic layouts is, once you learn a pattern, transposition is easy, and chords and harmonies are generally easier to find. (A guitar, for instance, is actually isomorphic; a piano is not. I like pianos, and you can learn to transpose on them, but for learning a new instrument, this is an ideal choice.) At the Ableton demo last week, we got to see “Giant Steps” played in all keys.
And, of course, you get all of this with pressure, mapped to aftertouch. If you can accommodate the grid layout, that could make Push a really expressive instrumental controller, particularly with the ribbon controller. The challenge may be fatigue playing pads; some velocity sensitivity adjustment will be necessary. But the pads felt good even on a prototype unit. Yes, they’re Akai-built pads.
A look at the isomorphic pitch layout, with blue lights indicating equivalent pitches.
As a “controller,” Push does all the business with clips you’d expect. What seemed impressive in early demos was how tightly it could integrate with the production workflow. You can quickly drop into recording a clip or overdub settings, adding to a track as you go.
There are various clever features. For instance, since the color scheme could be potentially confusing, lights pulse to show active clips for playback and recording. A display shows you the remaining time in clips. And crucially, you can navigate Live, and select clips without launching them. The APC and Launchpad for me never quite got to the stage where I could hide the computer and still use Live; it looks like Push just might.

We’ll look closer soon at how these mappings work, but there were already impressive examples in which Push was running step sequencers, triggering and recording clips, and playing instrumental solos, all right out of the box – no fancy Max for Live patching required.
If fancy Max for Live patching is what you want, you can do that, too. You can “hijack” everything Push does as far as Live control and customize it, with complete control over the hardware and the way the software responds. There’s also a “user” mode, as with Launchpad, which you can assign to your own tools (like a plug-in, for instance), then switch between them. Right now, you can’t use more than one Push in controller mode, though you could presumably set the second to “user” mode and map it separately.
Ableton showed off the Push at a private demo event last week, demoing it by pulling it out of a small backpack to illustrate how portable it is. The hardware really looks beautiful and feels luxurious, more so than any of this class of controller we’ve seen previously, on first impression. On pads, it will have to live up to the fantastically-responsive pads on the new Native Instruments Maschine, but of course you get 64 instead of 16, and the Push appears to be more versatile as a Live controller. (One Push, one Maschine may be popular among those who can afford both.)
Weight: 2990g / 6.59 pounds.
Cost: USD 599 / EUR 499, including Ableton Live 9 Intro.
As with Live 9, Push is promised for first quarter of 2013. And you’ll need some version of Live 9 to use it – at least with its native control features, which are kind of the point. (Well, though I do expect some hacker to do something ridiculous with this and Renoise. Let’s get on that.)
(You’ll still need separate hardware for audio, but I’d choose compactness and bus power over that, anyway; I’ve got an audio interface.)
No one controller can suit everyone, but I have to say, Push looks like it makes a reasonable set of compromises. Fortuantely, there’s nothing stopping hackers from doing their own, similar controls in Live 9 if they desire. But for those who do want something off the shelf, Push is a big leap forward. We’ll be testing it as it becomes available, and then can look more closely at how mappings work.


As with Launchpad and APC, there’s a logical mapping of Session View to the controller. (Arrange View is actually not really a focus.) Unlike the past hardware efforts, though, you have enough controls on the device that you should be able to hide your laptop away and still make music or perform.

Credit : Create Digital Music

Thursday, April 19, 2012

DJ Tech : DJing In Ableton

small-splash

For the past several years, Ableton Live has established itself as a popular and powerful DJ tool, with many top DJs routinely using the software in clubs and stages around the world. While the switch to Live may be daunting for those accustomed to traditional DJ paradigms, the advanced performance capabilities offered can be very worthwhile. In this series, we explore how DJs new to Ableton can use Live 8 to unlock greater creativity in the booth, starting with an overview of Session View and a lesson on how to easily warp dance music for sets.

Why Live? A Different Kind of DJ


Live stands apart from other DAWs in that it has always been as much about performance as it is about production. The software was from the onset designed to be used on stage, with forward-thinking users taking advantage of Live’s noted clip launching and timestretching facilities to suit the particular needs of DJs.
Some of the benefits of Live for DJs:
  • Songs stay perfectly in sync without manual beatmatching with track warping
  • Song tempo can be changed without affecting pitch
  • On-the-fly remixes and mashups
  • Top notch built-in effects
  • Unparalleled flexibility: set up your Live DJ template any way you want it
  • Unlimited number of virtual “decks”
  • Option to use third-party VST and AU plug-ins and Max For Live devices in sets
  • Optional integration with Serato via The Bridge, as well as VST-based DVS systems like Deckadance and Ms. Pinky
  • Combination DJ/live PA performances
Of course, DJs have their complaints about Live as well. Users have bemoaned the lack of a multiple waveform display like those in dedicated DJ software like Traktor and Serato for years now. DJs making the move to Live will also have to get used to the lack of independent tempo control for tracks, as all warped songs lock to the project tempo- a significant adjustment for those who play with large, frequent variations in tempo between tracks. A certain learning curve and a fair amount of setup is required as well, and so those who like working on a traditional DJ user interface might want to look elsewhere.
But for DJs who want to break from tradition or are looking for a fresh dose of inspiration, Live may be the thing that will help create those electrifying dancefloor moments that we all strive for.
For a deeper look into the pros and cons of DJing with Ableton vs traditional DJ software check our last article on the subject.

A LOOK AT LIVE’S SESSION VIEW

Live's Session View (click for full screen)
Live offers two “environments” in which to create and perform music: Session View and Arrangement View.
Arrangement View is most similar to a traditional DAW layout, which horizontally arranges recorded audio, musical samples and MIDI notes (collectively referred to in Live as “clips”) along the current project’s musical timeline, and is suited for production work. DJs will be more interested in playing tracks in Session View, which essentially is a grid from which to control and launch clips on-the-fly.

 Audio Tracks

Session View presents audio (and MIDI) tracks as vertical columns, each of which can be renamed and which contain an unlimited number of clip slots.  Each clip slot can hold one piece of audio, and each track can play only one clip at a time. Think of the audio tracks as your virtual decks.
DJs will want to have at least two audio tracks in their Live template, which gives you two “decks” or one audio track for each song you’ll want to play simultaneously with each other. DJs will normally only use audio tracks, so delete any MIDI tracks from Session View for now.

Track Status Field


Below the clip slots in each track is the Track Status Field. Tracks with a non-looping clip will have a bar displaying the remaining play time in the clip in minutes:seconds. Tracks with looping clips will have a pie chart displaying the current progress of the loop. The number to the right of the pie measures the length of the loop in beats, while the number on the left tells you how many times the loop has already played.


 Browser

To the left of the audio tracks is the Browser, which is used to organize audio and MIDI files, Live devices and installed plug-ins. The File Browser is your virtual crate. You can find and drag songs you want to play from the Browser into audio tracks, though it might be easier to just use Windows Explorer or Finder (or iTunes) to organize and bring songs into Session View. One advantage offered by the File Browser is that it lets you preview songs through your headphones, though I’ve found searching for specific songs to be more efficient outside of Live. You can cue up songs using audio tracks anyway.


Return Tracks

To the left of the Master are the return tracks, which receive audio via the track sends. These can be useful in DJ sets, but are not necessary for warping and basic mixing, and can be deleted or simply ignored for now. More on these in a later lesson.


 Tempo and Transport Controls

Finally, the tempo and transport controls are found above the tracks and Browser. Alongside the transport controls is the global quantization tab, which you’ll want to pay attention to. The upper-left section contains the master tempo, tap tempo, budge buttons and metronome switch, all of which will be frequently used by Live DJs.

Warping Songs

Now that we’re familiarized on different elements of Session View, we can look into preparing tracks for DJ sets in Live. The most important aspect of Live for DJ performances is warping, which is what Ableton calls its timestretching function. Warping is used to tell Live where the beats in a track fall relative to the project’s timeline, allowing DJs to lock audio tracks to the master tempo and keep everything perfectly synced and beatmatched. It also allows DJs to speed up or slow down tracks without affecting pitch, if so desired. A good analogy for how warping works would be to think of your tracks as rubber bands that you can pin down (using Warp Markers) and stretch along a ruler (the musical timeline).

Live’s Warp Modes
Live offers six different Warp Modes, each designed for different kinds of sounds. For example, Beats Mode is best used with strong rhythmic sounds like drums, while Tones Mode is recommended for monophonic sources like bass or vocals.
For playing back whole songs, the Complex Pro and Re-Pitch Warp Modes are the best options. Re-Pitch Mode works in the same way as a turntable’s pitch control, pitching tracks up or down as the playback speed is changed. This offers the best overall sound quality, without the artifacts one gets using the other warp modes.
If you want to change tempo without affecting pitch, Complex Pro is the best option, as it is designed to work well with sources combining the kinds of sounds covered by the other warp modes. Complex Pro, like its predecessor, Complex Mode, requires over ten times more CPU resources than other Warp Modes, but most current laptops set up for DJ performance should be able to handle this CPU hit without any problems.
Similar to how Traktor users beatgrid tracks prior to performances, Ableton DJs will want to have their tracks warped beforehand. Live can be set to automatically warp tracks for you, and while it generally does a good job at this, it is always best to correct this warping manually. This warping information can be saved in an .asd file that is automatically associated with each of your tracks, so you will only need to warp tracks once.

The Fundamentals of Warping

Ableton Clip View (click for fullscreen)
There are different ways to approach warping, and over time, you will develop a method that works most efficiently for you. But whatever the method, the basic tools of warping remain constant. Here are the elements from the above screenshot you’ve got to be familiar with to start warping:
1. The Time Ruler: The Time Ruler appears above the waveform in the Sample Display. With Warping on, the Ruler divides musical samples into bars and aligns these with the project timeline.
2. Warp Markers: Returning to the earlier rubber band analogy, Warp Markers are the pins that are used to lock segments of your track to the musical ruler. Warp Markers are created by double-clicking within the sample, and appear as yellow tabs along the ruler. They can then be moved around by dragging or using the arrow keys.
3. Pseudo Warp Markers or Transient Markers: Live automatically analyzes audio files when you first drag them into Session View and locates the transients in the sample. Transients are the spikes in volume at the point where notes or beats begin. These are marked out by Live in the Sample Display using Pseudo Warp Markers, which are gray instead of yellow, and come into view when the cursor is moved over transients along the musical timeline.
Transient detection in Live is often very accurate, and should be used as a guide when placing Warp Markers. Pseudo Warp Markers can be converted into Warp Markers by double-clicking on the gray tabs.
4. The Sample Box: This is where you control the different clip-specific settings such as Warp Mode, clip BPM, sample start-end points, and loop points. You will want to have Warping engaged, and either Re-Pitch or Complex Pro set as your warp mode. The Seg. BPM box tells you the analyzed BPM of the track. This will typically reflect a whole number for properly warped tracks.
The 1-minute Warp
Now that you know the basic elements of Ableton, you can warp your first track. Most current electronically-produced music, from the steady four-on-the-floor beats of house and electro to the broken beats favored in dubstep and contemporary hip-hop, will have a constant tempo throughout an entire song. These tracks are very easy to warp, and most of the time, you will only have to place about 2-4 Warp Markers to get songs in perfect sync.
With practice, you will be able to warp such songs in under a minute, and even be able to warp tracks in the middle of a DJ set. Here’s my approach on how to do it (turn on captions in the video above for simple step-by-step instructions):
1. Bring Your Track Into Session View
Drag your track (use one with a steady, constant tempo from start to finish- no old Motown songs with live human drummers for now) from the browser into an empty clip slot in Session View. If this is your first time bringing the track Live will automatically analyze and warp your track, and create an analysis file (.als), which will take several seconds.
Here’s a quick tip: it is generally a good idea to have the Master Tempo set in the same neighborhood as the BPM of the track you are bringing in for warping, as this will help Live more accurately “guess” the clip BPM.
 2. Clean Up Automatic Warp Markers
Delete the Warp Markers that were automatically inserted by Live. To do so, click on one of the Warp Markers, select all (ctrl+A on Windows, cmd+A on Mac), and hit delete. You can also fix this permanently by turning off warping in the Ableton preferences, as seen below:

3. Look For First Downbeat
Locate the first beat in the song by moving the mouse cursor near the start of the waveform, over the bar numbers. The cursor should change into a magnifying glass. Hold down on this area with the mouse and drag down to zoom into the waveform.  Drag left or right to scroll through the waveform. The downbeats, typically the kick drum hits, can be easily spotted in the waveform as these will usually have the largest transient spikes.
4. Drop Your First Warp Marker
Look for the Pseudo Warp Marker on the first downbeat of the track. Double-click on this Pseudo Warp Marker to turn it into a Warp Marker.
 5. Set Start Of Track
Right-click on the Warp Marker you just created and then click on “Set 1.1.1 here” so that the track starts at this point when launched. Then click on “Warp From Here (Straight).” This Warping method will work well since the track has a constant tempo all throughout.

6. End-of-track Warp Marker
Zoom back out and look for a numbered bar at the end of the track. Zoom in close to look for the Pseudo Warp Marker at the transient of the downbeat at the start of the bar, and double-click to turn this into a Warp Marker. Drag this Warp Marker so it lines up with the bar number. There should be one right by it if the track you are warping is of a constant tempo.
7. Tidy Up
Most of the time, this is all you will need to do to have a properly warped clip that lines up perfectly with other warped tracks. In some cases though, the Pseudo Warp Markers in the middle of the song might have drifted away from the bar numbers. Drifting of a small distance will generally not be a problem when DJing.  But if you wish to correct this and tighten up the warping, simply zoom into 1-2 bars in the middle of the waveform, look for the transient, and repeat what you at the end of the track: double-click on the Pseudo Warp Marker to turn it into a Warp Marker and drag it to the nearest bar number.
8. Save The Warp
Click on “Save” in the Sample Box to save the warping and other clip information in the track’s associated .als file. If you did all these steps correctly, the “Seg. BPM” number in the Sample Box should be a whole number (like 126), or very close to a whole number (like 125.98). Some DJs like to type in the closest whole number before hitting “Save”.
9. Have A Listen 
Make sure that global quantization is set to 1 Bar and that the metronome is on. This ensures that your song starts playing at the start of the next bar. Launch the clip and listen if the beats are in time with the metronome. If the beats all fall in time with the metronome throughout the track, then it is properly warped.

Credit : DJ Tech Tools

Thursday, March 8, 2012

DJ Tech : DJing With A Computer Keyboard

abletonkeyboardcover
Digital DJing and controllerism has come a long way from simply “laptop DJing” (say it with contempt for full effect), but for most digital DJs the laptop remains the central part of their setup. While there’s usually a better workflow than hunching over your keyboard, there are instances where using your computer’s keyboard gets the job done better than anything else. In this article we explore the best uses and mapping considerations for the buttons that you always have with you on your laptop!

THE FULL SETUP

In an ideal world, you’ll be set up with a powerful controller or two. But there are plenty of DJs getting started, still searching or saving for the perfect controller. If you’ve already got that perfect controller, what happens if it gives up the ghost in the middle of a gig? The computer keyboard might not be the most stylish or the most gratifying way to manipulate your DJ software, but it’s often faster and more effective than your trackpad or mouse.
Different software deals with keyboard mapping in different ways. Of the ‘big three’ – Ableton Live, Traktor, and Scratch Live – Traktor’s is probably the most powerful, but in exactly the same way as its MIDI mapping system, it’s the most fiddly.
Ableton Live’s key mapping system works in exactly the same way as its MIDI mapping; learning is quick and easy – but it’s actually a little more flexible as shift, alt, and shift+alt can be used as modifiers.
Despite sensible layout (including logical modifier layers) Scratch Live provides no way to modify Serato’s default key mapping, so it’s the clear nag in this particular race.
Ableton’s key mapping approach is surprisingly flexible, combining its click-to-learn approach with four states per key with simple modifier commands. The modifiers keys include alt/option, command, control, and shift. The only thing that isn’t ideal is its inability to recognise held keys, meaning toggles are the only option and momentary switches are out.
Traktor comes with a pretty decent default map for a two deck setup, but it’s not the best thing for every situation. Take a look at this mapping from Eric Zone (courtesy of TraktorBible), which approaches things a little differently to the default mapping. There’s less in the way of features, but a concise workflow that allows for effects, quick access to loops, and mixer functions.

Thinking Ahead

Our number one tip for making your  own keyboard mappings: plan ahead! A little thought into a map that will work best for you – either to enhance your setup or act as a emergency backup controller – will go a long way. Consider your most often used functions!
Ableton Live’s a blank canvas, and in the same way that you need to set your DJ set up from scratch in Live, you’ll have to set your key map up. Traktor’s controller editor is notoriously labourious to use, and despite Live’s surprise strength when it comes to key mapping you’d be surprised how quickly you can become key-blind staring at a list of commands in the mapping editor, so I whipped up this keyboard template image for your brainstorming sessions. Click here to download at 300dpi!

AN EXTRA CONTROLLER

Some DJs aren’t put off by the idea of using a keyboard in the booth at all – in fact if you have a nice keyboard you might actually prefer the feel of the buttons over those found on some MIDI controllers. A computer keyboard can actually do some cool stuff; I’ve cooked up a little FX bank for Traktor as inspiration and to show how a bunch of buttons can go a long way.
Check out my basic Traktor Pro 2 keyboard based FX layout here(Warning: this .tsi contains keyboard mappings and effects settings, so be sure to have anything you choose to import backup up safely if you want to keep existing settings!)
Ergonomic Considerations
  • Your keyboard has a whole lot of keys that each do a single thing: get pressed and register a command. Fans of Midi Fighters, Monomes, and the like will already be in ‘binary mode’ when thinking about mappings, but if you’re a little more used to thinking in terms of knobs and sliders then smart use of buttons is sometimes a foreign concept.
  • Because keyboards have no knobs and sliders, think about how you actually use effects and what you need in order to get as close as possible to your normal operation with just buttons. For example, you can’t smoothly adjust EQ, but you can hit a full kill in one movement. You can’t ride the pitch fader, but you can use pitch bend buttons to nudge you back in phase.
  • If your play style revolves around juggling cues, something to experiment with is assigning two adjacent buttons to the same action to allow you to ‘twiddle’ the two buttons and at the same time reduce the risk of accidentally hitting the wrong button in the heat of the moment.
  • Be careful when putting buttons close to each other! This is a pretty universal concept whether you’re on a keyboard or a controller, but if your load track or stop button is right next to your ‘instant cool FX’ button, you’re playing with fire. The mapping above from Eric Zone almost certainly has ‘lock playing deck’ switched on when it’s being used, because of the proximity of the load button to all the rest of the controls.

LIBRARY MANAGEMENT

There’s another very valid use for your computer’s keyboard, and that’s helping out with the often gruelling task of managing your track library. Things like adding tempos, cues and beat grids can be a hassle in Traktor, but with a mapping on standby that you can switch to during downtime you can mitigate the frustration of using the mouse – or worse still, the trackpad – to get these important tasks done. Rainier over at Traktor Bible has a pretty sleek mapping designed just for this purpose over here. TraktorBible’s Beatgridding with Keypad map.

REMEMBER THE CONTROLS!


So you have a setup you like. It’s just that remembering that ‘F’ is hotcue 2 isn’t the easiest thing in the world to do. If only there was some way to customize your keyboard to make things easier to remember!
You have a few options when it comes to improving the memorability of your keyboard maps, from off-the-shelf rubberized overlays designed to fit a variety of keyboards and work with the out of the box mappings (the DJTT webstore stocks the KBcovers pictured above for both Serato and Traktor) to customizable blank keys that can either be printed to or written on (like these over at Amazon for less than $2), to stationary stop gaps like small colored dot marker stickers.

Wednesday, January 26, 2011

Dj Tech : Battle of the 1s and 0s. Traktor Vs Ableton Vs Serato

It’s tough to compare digital DJ equipment nowadays – wildy different feature sets, approaches and, of course, price tags, mean that one man’s trash really can be another’s treasure. Let’s take a look at four of the big ones and try to figure out your ideal partner…

Put very simply, Ableton Live is the curveball, Scratch Live ( its brother Itch) and Traktor are the major league players caught at loggerheads, and Virtual DJ is the everyman underdog. But, of course, nothing’s ever simple nowadays… There are a variety of flavours of each to suit various tastes and it’s important to get to know what they can each do for you.

BEFORE WE BEGIN…

Something that everything in this article will rely on and assume is that you have a reasonably powerful computer. What ‘reasonably powerful’ actually constitutes is a bit of a contentious issue, as what one user is prepared to put up with at a pinch could be a dealbreaker for another. I would suggest (but by no means ‘recommend’) that a 2ghz Core 2 Duo or equivalent and at least 2GB RAM is a good low-end solution… your mileage may vary!

A good audio interface is important for digital DJing, as minimal latency is required for accurate manipulation and usually multiple channels are required for sending audio to external equipment and monitoring. Serato and Traktor Scratch products have an advantage in their inclusion of an audio interface; you will need to research appropriate interfaces for other software.

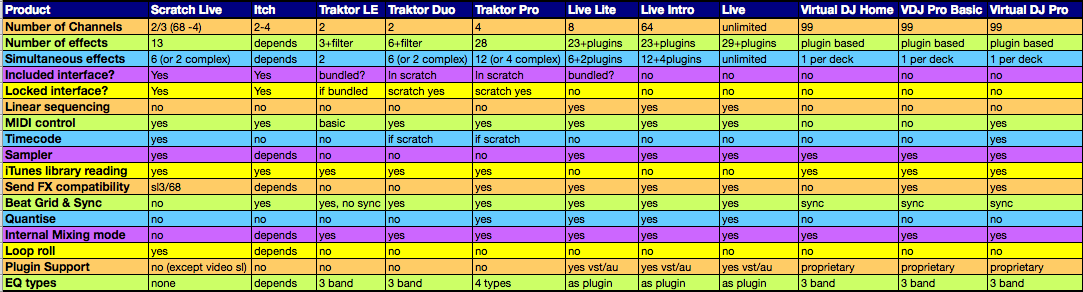
Finally, all the products below have a few different versions, from the ‘light’ version all the way to the full fat, bells and whistles “pro” one. There’s a link to each manufacturer’s comparison page at the bottom of each section. I’ve also drawn up a comparison chart of the various software detailing their functionality for some important features below.


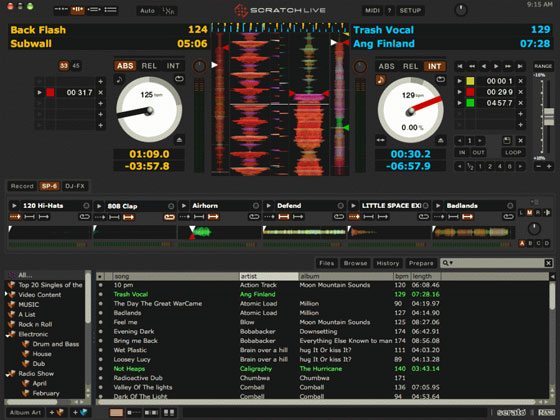
Serato Scratch Live/Itch


Serato make both Scratch Live and Itch. Itch is similar in many ways to Scratch Live, but at its core it is the software that drives integrated solutions such as the Vestax VCI 300 and the Allen & Heath Xone DX. Scratch Live is a DVS – it’s founded on the principle that it can be added to an existing turntable/CD setup to bolster a user’s options and complement their existing work flow.

Both Scratch Live and Itch are closed box systems; without compatible, licensed hardware neither will run. Scratch Live only runs with certain Rane hardware, and the product you pick will give you different options, from the basic SL1 box to the world beating Sixty Eight. Itch is a bespoke solution for the product it is paired with, and customisation isn’t really possible.

Serato have a couple of unique tricks up their sleeve – their visual aids are second to none, with transients from audio sources displayed in a stalagmite/stalagtite view that dynamically alters as you change the speed to align the spikes, allowing blazingly fast tempo matching. The GUI is also very no-nonsense, and Scratch Live’s approach to MIDI is a very simple Learn function. Serato also implement a Loop Roll (that grabbing the sound and then returning to the song later effect) feature that nobody else does (in that form), and a sampler too.

SL1 vs SL3 comparison

Scratch Live Pros

  • Straightforward interface
  • Simple MIDI Learn
  • Sampler
  • Supports VideoSL video mixing via addon

Cons

  • Interfaces with most options (SL3, TTM57, Sixty Eight) are expensive
  • No beat gridding

Itch Pros

  • Beat grids and sync
  • 1:1 hardware control
  • Straightforward interface

Cons

  • No customization/expandability

Native Instruments Traktor


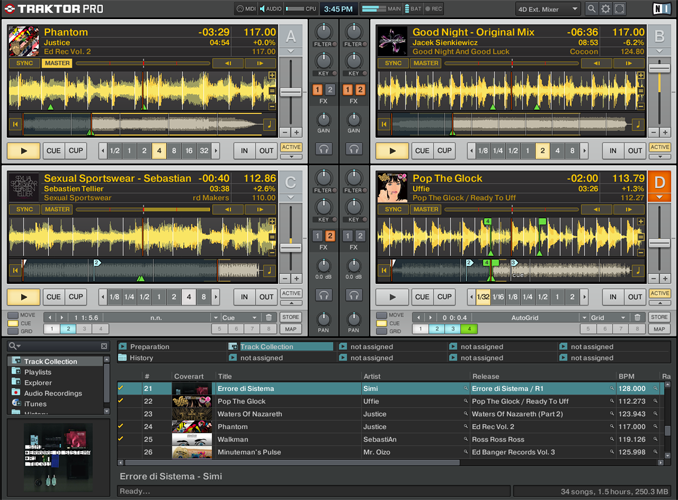
Traktor is a highly tiered piece of software – there’s an entry level, a mid level, a fully featured level, plus several DVS versions to boot. Whereas Serato have created two products to distinguish a core difference between users who want to use traditional DJ equipment (CD/Turntable) to control the transport and mixing of their audio from those that are more interested in ‘in the box’ mixing, NI have put everything DJ under the Traktor umbrella, and this gives Traktor advantages both in customization and expandability.

MIDI control is perhaps Traktor’s forte, and whilst it lacks an on screen learn function, it does have what basically amounts to a scripting system which allows complex modifiers and multiple commands per control. It has a greater number of cue points available than Scratch Live, and its beat gridding and syncing options facilitate super tight mixing. The current version lacks a sampler and doesn’t have a loop roll function ala Serato, but it can emulate both of those features with creative use of its effects. (the newest version of traktor that this site recently reported appears to have both samples and loop decks)

The Traktor Scratch timecode is also recorded at 2kHz compared to Scratch Live’s 1kHz signal – doubling the accuracy at which the system can calculate the stylus position on the record.

Traktor LE/Duo/Pro comparison / Scratch comparison

Pros

  • Powerful MIDI scripting
  • Traktor Scratch has most accurate vinyl timecode emulation
  • Beat grids and syncing

Cons

  • No MIDI learn means it’s more awkward to make spur of the moment changes
  • No Sampler (not counting the S4 edition)

Atomix Virtual DJ


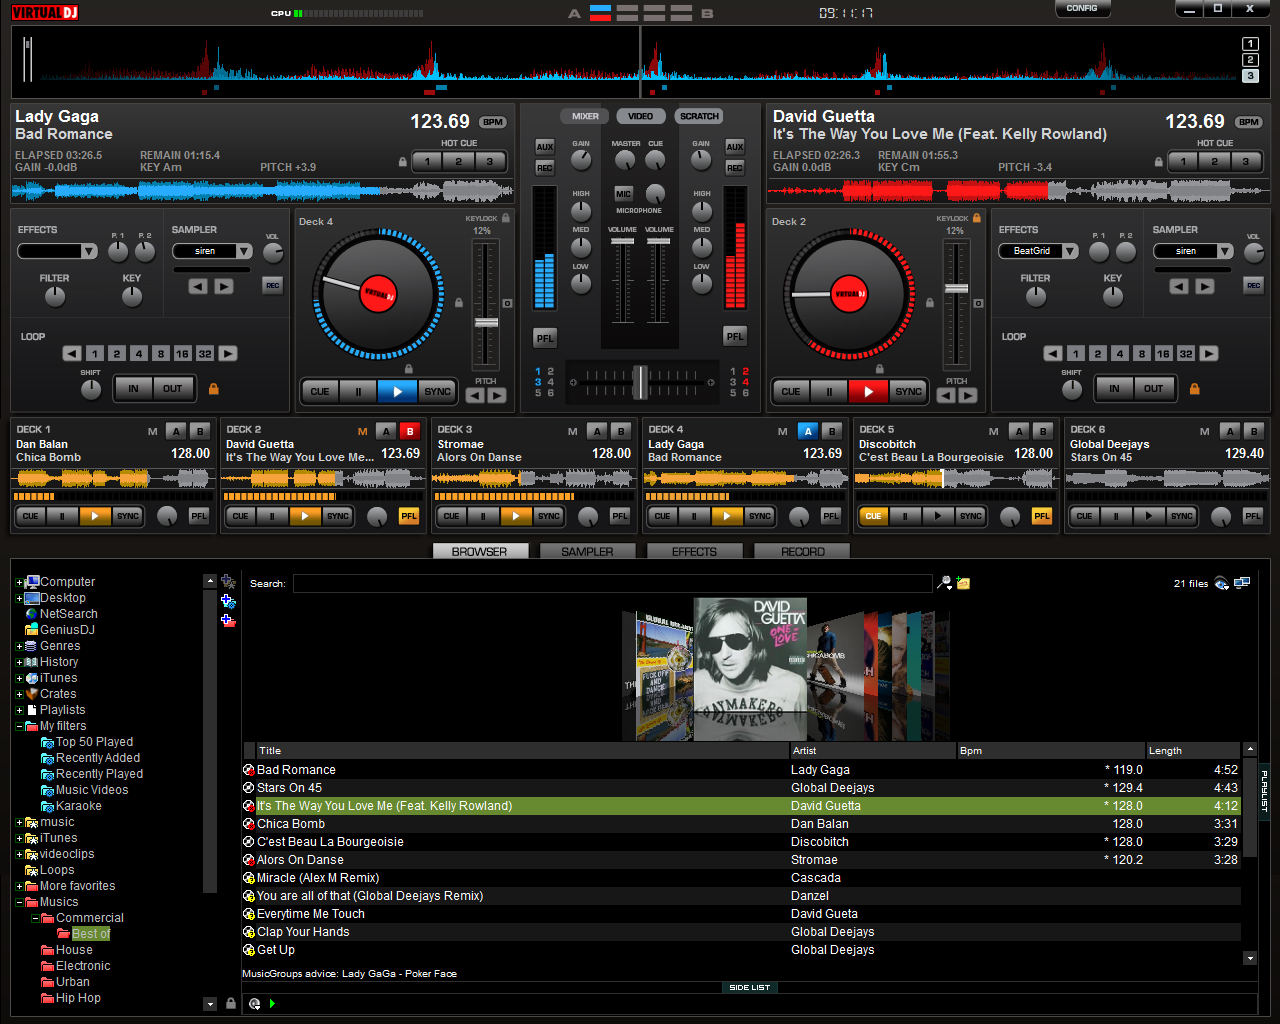
Designed as a much more open piece of software than Traktor or Scratchlive, Virtual DJ encourages personalization through skinning, custom effects, and freedom over audio routing. It also comes in three tiers – a totally free version (for non commercial use) Home, Pro Basic and Pro. The main difference between Pro and Home are audio routing options. With the Home version, everything must be done ‘in the box’, and channels can’t be routed to different audio interface outputs to go into an external mixer. Pro Basic also removes MIDI and timecode from the feature set. All versions feature effects, a sampler, and internal EQ, but lack any beat gridding or syncing options.

Virtual DJ is a solid piece of software, and things like its ability to use any time code and up to 99 tracks with restrictions over their output/input routing mean it may give you the options you’ve always dreamed for your zany outside-the-box setup – for those with really wild imaginations, it even acts as a ReWire master. Alternatively, if you have more limited, keyboard and mouse aspirations for your foray into digital DJing, it’s a very cost effective way to get in the game.

Virtual DJ is also what’s really under the bonnet of a few custom branded DJ solutions – these OEM versions have varying feature sets, often less routing solutions but some MIDI compatibility.

Version comparison

Pros

  • Home version is free
  • Unrivalled input/output routing
  • Highly customisable interface
  • Video mixing option

Cons

  • No MIDI control until the full priced Pro
  • Less simultaneous effects

Ableton Live


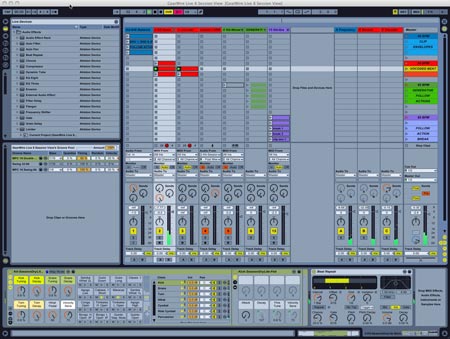
Live is the preeminent example of the hybridisation of DJing and production. There are high profile users of Live in both camps, and it seems to find favour with users who like to dabble on both sides of the fence. Live comes in four tiers – Lite, Intro, Full, and Suite.

DJing with Live is somewhat different to a traditional DJing setup, as it’s very much an empty canvas that confounds the two-four deck mixing style. Live allows you to run as many audio tracks as you like, and play them on top of each other, beside each other, around each other… basically, any which way. It’s much more geared towards progressive sets which have been planned out and combine elements of live production and remix; if your style is rocking out a party with the best track for the moment, Live’s not going to be the best thing to do that – as everything needs to be ‘warped’ (pre-prepared).

It’s a supremely customisable piece of software though, and can be infinitely expanded with studio quality AU/VST plugins and Max For Live, a special version of Max/MSP that runs inside Live – even timecode control can be added to the software. Not only that, but there’s also The Bridge…

Live Lite comparison / Live Intro comparison

Pros

  • Highly customisable to suit your workflow
  • Expandable with VST/AU plugins
  • The best option for live remixing

Cons

  • Doesn’t feel like the traditional ‘DJing’
  • Doesn’t suit on-the-fly parties

The Bridge


Live and Scratch Live sitting in a tree… The Bridge is the result of Ableton and Serato’s collaboration effort. It’s not so much a product as a way to connect Scratch Live and Ableton Live, allowing you to take each’s best elements, throw them into a melting pot, distill them… and other clumsy alchemic metaphors. Put simply, it allows you to trigger and manipulate a Live song from within Scratch Live, letting you not only trigger clips via the Scratch Live interface but also attach the song to a deck, allowing pitch and playhead manipulation. It doesn’t turn the Live song into a scratchable track, but it does mean that nudges can be done with as much precision as you would with an audio file and your tracks can be remixed on the fly. You can also record out to Live, with pre fader outputs dropping into their own channels. This doesn’t seem like a massive deal until you use it with a TTM57sl or a Sixty Eight, and all of your fader and EQ motions are also saved – in effect you get a non destructive mixtape, which facilitates going in and making things that little bit more special.

You do need a copy of both Scratch Live and Ableton Live to make use of The Bridge, of course…

Pros

  • Allows you to integrate the pros of Live and Scratch Live
  • Mixtape recording with a 57/Sixty Eight enables really tight fine tuning
  • Free for users of both Live and Scratch Live

Cons

  • High system toll
  • Expensive

COMPARISON

This is a lot of info to take in so perhaps this chart will help you compare digital dj software side by side:

Of course, the most important question is..

It’s all very well having a million tricks up your sleeve, and the temptation is always to buy the most feature laden version you can to ensure you don’t miss something you never realised you needed. In reality, though, it’s entirely likely that you’ll be just as happy with one of the intermediate level versions of a product – and don’t forget, manufacturers often provide upgrade incentives which allow you to buy in to the higher levels as your capabilities with the software grow. Here are five typical scenarios… do any of them sound like you?

I want to bolster my vinyl/CD based setup with a few additional capabilities, but mainly the ability to use my digital music library

Traktor Scratch Duo might be the best option for you. It’s inexpensive, has a great audio interface included, and will allow new options like cueing and looping to become part of your arsenal.

My decks are important to me; I don’t want to lose any quality when scratching nor lose my edge when going to clubs. However, I want to see how far I can take DJing creatively

Look at Scratch Live with an SL3 or Traktor Scratch Pro. With the opportunity to use effects, extensive MIDI control and powerful digital manipulation options, you’ll be able to do things that are impossible with vinyl – but for the times when only vinyl will do, you’re an input switch away from putting your trusted wax back on the decks.

I’m a producer, and I want to get into DJing. I really like the idea of bringing my production skills to the table

The obvious choice here is Ableton Live. You’ll be able to work out sets where you remix your own work on the fly and combine it with reworks and edits of other tracks. Alternatively, you could look into Traktor (and if you like the idea of scratching, Scratch Live or Traktor Scratch) for its huge effects power and cue point juggling possibilities.

I used my traditional setup because there was no other option. I’m not attached to all this gear – I want a more convenient, modern setup with lots of options

Don’t worry about Scratch Live or Traktor Scratch – DVS isn’t for you. Take a look around for a controller that really grabs your attention. If it’s Itch, problem solved. If not, Traktor Pro has a massive amount of effects and track manipulation options, syncing, quantising and more. If the thought of using more tracks than you have heads, shoulders knees and toes makes you giddy, Virtual DJ Pro will give you that power. Of course, so will Ableton Live, but in a very different way.

I’m a total beginner – I’ve got a computer, but a low budget. I want to dip my feet…

Virtual DJ has a home version which is free – it’s definitely geared towards hobbyists and hasn’t much in the way of control, but it’s fun for a dabble. Ableton offer 30 day trials of Live, and it’s worth taking a look to see if Intro takes your fancy.

Take a look at controllers and audio interfaces in your price range. Many come bundled with Live Lite, Traktor LE, or Virtual DJ LE. Not only will that give you excellent value for money, but discounts are available for upgrades to full versions of the softwares and you can learn as you save.

Hopefully you’re a little wiser as to the differences between these four digital DJ solutions. It would be remiss of me not to mention that there are of course a great deal more options on the market than these four, but were we to disseminate the pros and cons of everything on the market you’d never buy anything; perhaps a pertinent point is that you could DJ with a tape deck and a guitar pedal for effects if it took your fancy. Make sure your basic skills are on point and everything else will fall into place – including your sense of what features you actually need to take your DJing forward.

Monday, January 10, 2011

DJ Tech : Video - Controllerism Ideas for Ableton- Multiple Beat Repeats

All of you Ableton heads out there have probably used the beat repeat effect but I suspect most have never strayed far from the basics. By activating beat repeats manually (instead of by chance), you can take away the randomness and make the repeats happen when you want. When you use more than one copy of the effect you can create multiple layers of beats. Then work in a controller to interact with the beat in a really tactile and expressive way. In today’s article we will explore this basic but creative controllerism technique for Ableton Live.

The Beat Repeat effect can be used with all sorts of music to create an almost limitless amount of different effects and sounds. While the most obvious uses rely on using the Chance control in the lower left corner to vary the odds of a beat repeating, to me the most expressive use is by removing the random chance and playing the effect manually with a controller. With the right settings, you can use this to achieve great beat looping or shuffling, improvise new rhythms using drum loops or other sounds, or manipulate instrumental tracks on the fly.

In the intro video I used two sets of 3 beat repeats, each controlled by a different control on my midi controller. I used the same settings on each set of three to show off two different control possibilities. The video can give you some idea about what you can do, but the best thing is just to try for yourself.

SET IT UP

  1. To begin, lower the Chance setting to 0.00% and assign the Repeat to a midi control.
  2. Change the grid size to, 1/8 and leave the rest of the settings alone for now.

Every time you press the midi key assigned to the Repeat button, whatever was playing at the time that you pressed the key will repeat every 1/8th of a bar. Depending on what kind of midi control you use for the repeat, the effect will either be momentary or toggle between on and off when you press it. Regular midi notes will act as as switch, while pressure pads, for instance, will only have the effect on while they are pressed down.

Add two more beat repeats with different grid sizes and assign the Repeat button to more midi controls. The size has a great impact on what kind of rhythm you develop as you use the effects. Put larger grid size repeats on the left side of the mixer drop area so that the larger grids are not flooded by the smaller, more frequent repeats. When you are finished, your beat repeats should look like this.

HOW IT WORKS

First a word on exactly what is happening. Beat Repeat is basically a looper that loops 1 bar or less. The effect records one bar in a buffer at all times. When you press the repeat button, the effect waits until the next interval of the grid size and then repeats that grid size until the effect is turned off. If the grid size is small, the effect turns on almost immediately, however with the largest setting, One Bar, it waits until the next bar before repeating. To repeat a beat, simply press one of the controls when you hear the sound that you want to repeat.

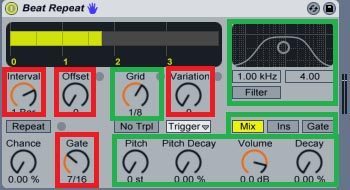
By turning the chance to 0.00%, the controls outlined in red no longer function. You can use the controls outlined in green to change what and how often the effect repeats.

Try using the Ins (Insert) setting. This will cause the repeated sound to completely replace the original sound. This setting is a lot harsher and produces more drastic effects. I would recommend using it on only one beat repeat at a time to keep from destroying the mix too much.
Sometimes the repeats will drown out a track, especially is you are using this technique on instrumental tracks but the filter will solve this problem. I like to set the filter based on the grid size of the repeats. You can also use this to add variety to drum tracks. Try the settings below and then experiment to find the perfect sound for you.

Experiment with the other controls by assigning them to a midi controller. For example, I have a control set up to raise the Decay of all three Beat Repeats to 15% and another to switch all three Filters on and off. Other than that, it is probably better to use as few controls as possible. A simpler control scheme usually results in a more powerful effect.

TRY IT OUT!

You can use as many Beat Repeats as you want. Depending on the grid sizes, pitch, decay, and other settings can either provide subtle or extreme effects for all types of music. One great option is to use only one Beat Repeat with a favorite grid size (my favorite is 1/6) so you can add some extra flair to a rhythm at the touch of a button. This effect is great because it gives you tactile control over any clip you are playing in Live. Try it out and see what you come up with.